Hunterstory Guide
This page was written a long time ago and it hasn’t aged very well, sorry about that.
Table of Contents
- Some Basics of Hunterstory
- Part One: Noob
- Part Two: Midgame
- Part Three: Grinding
- Part Four: Finale
- Ascending
Guide Structure
The core gameplay loop of Hunterstory is collecting enough grade points to unlock the next missions.
Along the way, this guide will present examples of expected progression, which you can use as examples if you ever get stuck.
Hunterstory Basics
| Term | Meaning |
| Mission | A “level” in Hunterstory. |
| Mesos | The currency of Hunterstory. |
| Points | Obtained when you complete a mission. |
| Rank | Determined from your score on a mission. |
| Grade Point | Required to unlock better missions, with stronger monsters. |
| Rush (mission) | A special type of mission where monsters spawn much faster than usual. Marked with red text. |
| Boss (mission) | A special type of mission where a boss monster is spawned over the regular monsters. Marked with blue text. |
Main Screen
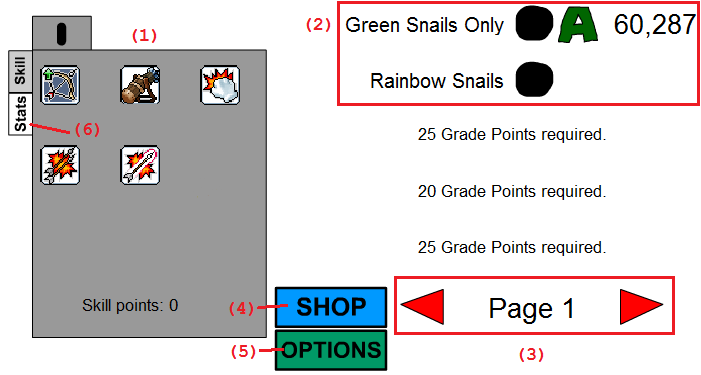
- This is the Skill Box, which contains all your skills.
- These are the missions. Displayed is the mission name, rank, and points gained from the mission, respectively. Click the black blotch to start the mission.
- Navigates the pages of missions contained in the game.
- The Shop: buy stronger bows and other various stuff.
- Options: Lets you set keys to use active skills, and some other things.
- Stats: Displays Level, EXP, Damage, etc.
Battle Screen
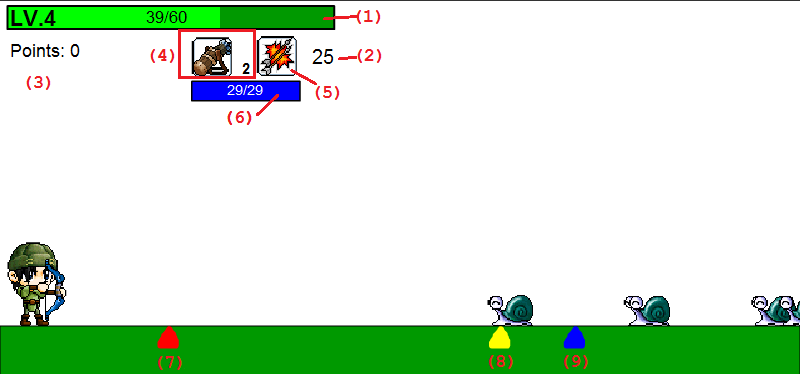
Click and hold to shoot an arrow. The position of your mouse determines where the arrow will go.
The closer the mouse is to your character, the higher it will go.
- Level/EXP bar. Displays current level and EXP.
- Number of monsters you need to kill in order to finish the mission.
- Number of points you have gained from the mission.
- The type of arrows you have, and how many left.
- Your currently selected skill.
- MP bar. Using skills costs MP, so watch this bar.
- The death line: don’t let the monsters cross here.
- The repel line: this will be pushed closer towards you as monsters get closer. It comes back to the blue triangle slowly.
- The starting line: the repel line starts here at the beginning of a mission.
Part One: Noob
This part will cover the first few pages.Welcome to Hunterstory! When you start, you will see only one mission, Green Snails Only.
Finish that mission, and then finish the mission that you unlock next, Rainbow Snails.
Keep doing these two missions until you get A ranks on both. Don’t lose hope! This is the hardest part of the game!
After that, you will unlock Shroom & Friend, then Shroom & Big Friend and Red Snerg Rush.
At the minimum, get a C on Shroom & Friend and Shroom & Big Friend, and a D on Red Snerg Rush.
Door of Accomplishment 1
Green Snails Only - A
Rainbow Snails - A
Red Snerg Rush - D
Shroom & Friend - C
Shroom & Big Friend - C
33 GP
Move on to Page 2. Finish the mission Trouble Bubbling & Logger’s Nightmare, and get a B on both missions.
Then, train at Double Bubble Trouble, while occasionally trying to get a C rank on Slithers & Spikes and Fungi Force.
Go back to Page 1 and:
B rank on Shroom & Friend and Shroom & Big Friend.
… which will give you 6 GP.
Door of Accomplishment 2
Page 1 - A/A/D/B/B
Trouble Bubbling - B
Logger’s Nightmare - B
Double Bubble Trouble - D
Slithers & Spikes - C
Fungi Force - C
68 GP
Move on to Page 3. Get a B on Land of Wild Boar I and Land of Wild Boar II.
Train at the newly unlocked Leporidae Marching Band, and get a B rank on Land of Wild Boar III once you unlock it.
Door of Accomplishment 3
Page 1 - A/A/D/B/B
Page 2 - B/B/D/C/C
Land of Wild Boar I - B
Land of Wild Boar II - B
Land of Wild Boar III - B
Leporidae Marching Band - B
100 GP
Move on to Page 4. Get a B rank on Pixies & Faeries and a C rank on Lorang Lorang
There’s a new mission on Page 3, the boss mission March of the Slime King. Get a D rank on it.
The easy way to complete a boss mission is to aim for the lower part of the boss, so you can take down the boss and the boss’s grunts without moving your mouse.
After you’ve done that, B rank the other two missions on Page 4, Chronos Platoon and Pixies Part II.
Portal to Midgame
Page 1 - A/A/D/B/B
Page 2 - B/B/D/C/C
Page 3 - ../B/B/B/B
March of the Slime King - D
Pixies & Faeries - B
Lorang Lorang - B
Chronos Platoon - B
Pixies Part II - B
135 GP
Second Part: Midgame
This part will cover the next few pages.Now, you need 15 GP to unlock each subsequent mission, instead of the 7 or 8GP before.
That means we will have to go back to previous missions and get better ranks on them :)
We need 43 GP to unlock the first mission on Page 6. So, let’s raise some ranks:
Go back to Page 1-2 and:
- B rank Red Snerg Rush
- A rank Shroom & Friend and Shroom & Big Friend
- A rank Double Bubble Trouble
- B rank Slithers & Spikes
- A rank Fungi Force
… which will give us an extra 22 GP.
Now we complete each mission in order on Page 5. Get a B rank on Chronos Brigade, Welcome to Omega Sector, and Cybernetic Defense Squad.
Door of Skill 1
Page 1 - A/A/B/A/A
Page 2 - B/B/A/B/A
Page 3 - B/B/B/B/B
Page 4 - B/C/../B/B
Chronos Brigade - B
Welcome to Omega Sector - B
Cybernetic Defense Squad - B
185 GP
Now we need 80 GP for Page 7. Let’s set a smaller goal: 40 GP. This will give the first of the two locked missions on Page 5, which can be easily done to get the second locked mission.
Go to Page 4, and get a C on Trojan War.
Go back to Page 2-3 and:
- A rank Trouble Bubbling and Logger’s Nightmare
- A rank all of Page 3
… which will give us 14 GP.
Now, only 21 GP is needed. Get a B or higher on Dangerous Valley, Watch Out for Icy Path, and Defeat Kittens.
We have both Cold Field and Chief Gray unlocked! Get an A on Cold Field and a C on **Chief Gray **to unlock Star, Sun & Moon. B-rank that to unlock Defeat Monsters, which you should C-rank.
All we need now is 9 GP! Getting an A on everything but Trojan War on Page 4 will give us that.
Door of Skill 2
Page 1 - A/A/B/A/A
Page 2 - A/A/A/B/A
Page 3 - A/A/A/A/A
Page 4 - A/A/../A/A
Page 5 - B/B/B/../..
Trojan War - C
Dangerous Valley - B
Watch Out for Icy Path - B
Defeat Kittens - B
Cold Field - A
Chief Gray - C
Star, Sun & Moon - B
Defeat Monsters - C
267 GP
Finally, your first easy mission page! There are two boss missions and one rush mission on this page.
Get an A on Forest of Dead Trees and then Dangerous Valley II, and you’re done!
Door of Skill 3
Page 1 - A/A/B/A/A
Page 2 - A/A/A/B/A
Page 3 - A/A/A/A/A
Page 4 - A/A/C/A/A
Page 5 - B/B/B/C/C
Page 6 - B/B/B/A/B
Forest of Dead Trees - A
Dangerous Valley II - A
287 GP
Let’s do some AA’ing now! If you didn’t know, HunterStory has ranks past A: AA, AAA, and S.
Get these ranks:
- AAs on Page 1 except Green Snails Only and Rainbow Snails.
- AAs on all of Page 2-3
- AAs on the non-boss missions of Page 4
- B Trojan War
…which will give 41 GP.
We can easy pass Page 8 now. Get Bs on Drake’s Meal Table, The Crown-Flyer, and Yeti & Son to unlock Fire & Ice, and get a B on Fire & Ice to unlock the mission on the next page.
Door of Skill 4
Page 1 - A/A/AA/AA/AA
Page 2 - AA/AA/AA/AA/AA
Page 3 - AA/AA/AA/AA/AA
Page 4 - AA/AA/B/AA/AA
Page 5 - B/B/B/C/C
Page 6 - B/B/B/A/B
Page 7 - A/../../A/..
Drake’s Meal Table - B
The Crown-Flyer - B
Yeti & Son - B
Fire & Ice - B
360 GP
Onwards to Page 9! We are aiming for 398 GP to unlock the next mission on Page 10, which means we need to scrounge up 36 GP from somewhere.
Let’s continue AA’ing the rest of the missions, and improving some boss mission ranks.
- AA-rank the non-boss missions on Page 5-6
- A rank Trojan War
- A rank Chief Gray
… which will give you 37 GP.
We now have enough GP to progress to the next page. B-rank Wild Kargo’s Area, Excavation Site, and the newly unlocked Room of Courage.
The Portal to Grinding
Page 1 - A/A/AA/AA/AA
Page 2 - AA/AA/AA/AA/AA
Page 3 - AA/AA/AA/AA/AA
Page 4 - AA/AA/A/AA/AA
Page 5 - AA/AA/AA/A/C
Page 6 - AA/AA/AA/AA/AA
Page 7 - A/../../A/..
Page 8 - B/B/B/../B
Wild Kargo’s Area - B
Excavation Site - B
Room of Courage - B
421 GP
Third Test: Grinding
This part will cover the more grindy part of the game.Before you start with Page 10, continue with AAing every previous mission.
- AA-rank Forest of Dead Trees, Forest of Dead You, and Dangerous Valley II on Page 7
… which will give you 16 GP.
Get something else to do while you grind. This will take some time.
Train at Sanctuary Entrance I until you can easily AA rank it. Then, move to Wolf Territory I, Cave of Trial I, and Sanctuary Entrance II, and AA rank those missions too.
The AAs in these missions and the ones after are the easiest AAs you will ever get, since the monsters cover the entire width of the screen, so you will never miss if you’re trying to hit them.
Door of Strength 1
Page 1 - A/A/AA/AA/AA
Page 2 - AA/AA/AA/AA/AA
Page 3 - AA/AA/AA/AA/AA
Page 4 - AA/AA/A/AA/AA
Page 5 - AA/AA/AA/A/C
Page 6 - AA/AA/AA/AA/AA
Page 7 - AA/AA/../AA/..
Page 8 - B/B/B/../B
Page 9 - B/../B/B/..
Sanctuary Entrance I - AA
Wolf Territory I - AA
Cave of Trial I - AA
Sanctuary Entrance II - AA
491 GP
Move on to Page 11. We have only one mission: Garden of Darkness. Get an A rank that mission. It is a little tough, since the monsters are so small, but you’ll get it.
Now you’ve unlocked the next mission, R.C.M.P.This is a big jump in difficulty from Sanctuary Entrance II, so you will have to grind a lot more here than on Page 10. AA rank this mission.
Now you are 17 GP short of Page 12. You can get this by:
- AA’ing Drake’s Meal Table on Page 8
- AA’ing Fire & Ice on Page 8
… which will give you 6 GP.
Now we have unlocked Warped Path of Time; get an AA on that mission to reach Page 12.
Door of Strength 2
Page 1 - A/A/AA/AA/AA
Page 2 - AA/AA/AA/AA/AA
Page 3 - AA/AA/AA/AA/AA
Page 4 - AA/AA/A/AA/AA
Page 5 - AA/AA/AA/A/C
Page 6 - AA/AA/AA/AA/AA
Page 7 - AA/AA/../AA/..
Page 8 - AA/B/B/../AA
Page 9 - B/../B/B/..
Page 10 - AA/../AA/AA/AA
Garden of Darkness - A
R.C.M.P. - AA
Warped Path of Time - AA
533 GP
Page 12 is a very easy page to get through. But before we go knocking down each mission, we need some GP. There are still some leftover boss missions on Page 4 and Page 5 which don’t have an AA rank yet, so we can scrounge some GP from them:
- AA rank Trojan War on Page 4
- AA rank Chief Gray and Defeat Monsters on Page 5
… which will give you 11 GP.
Now, just complete each mission of Page 12 in order and you’re done with Page 12! You might need to go back to R.C.M.P. on Page 11 to grind more levels.
Portal to Ascendance
Page 1 - A/A/AA/AA/AA
Page 2 - AA/AA/AA/AA/AA
Page 3 - AA/AA/AA/AA/AA
Page 4 - AA/AA/AA/AA/AA
Page 5 - AA/AA/AA/AA/AA
Page 6 - AA/AA/AA/AA/AA
Page 7 - AA/AA/../AA/..
Page 8 - AA/B/B/../AA
Page 9 - B/../B/B/..
Page 10 - AA/../AA/AA/AA
Page 11 - ../A/../AA/AA
Warped Path of Time II - AA
Unbalanced Time - AA
Forgotten Path of Time - AA
Forgotten Path of Time II - AA
Lost Time - AA
604 GP
Fourth Test: Endgame
This part will cover the area past 4th job.There are a lot of blanks and under-ranked missions around Pages 7 to 9, so let’s fill in those.
- Get a B rank on A Crack in The Wall and Somebody Else’s House on Page 7.
- Get an A rank on The Crown Flyer and Yeti & Son on Page 8.
- Get an A rank on Yeti & Dad on Page 8.
- Get an AA rank on Wild Kargo’s Area, Excavation Site, and Room of Courage on Page 9.
- Get an A rank on Grave of Mushmom on Page 9.
… which will give you 52 GP.
Now you can AA rank all the normal missions on Page 13, and get at least a B rank on Cave of Trial III.
Path of Ascendance 1
Page 1 - A/A/AA/AA/AA
Page 2 - AA/AA/AA/AA/AA
Page 3 - AA/AA/AA/AA/AA
Page 4 - AA/AA/AA/AA/AA
Page 5 - AA/AA/AA/AA/AA
Page 6 - AA/AA/AA/AA/AA
Page 7 - AA/AA/B/AA/B
Page 8 - AA/A/A/A/AA
Page 9 - AA/A/AA/AA/..
Page 10 - AA/../AA/AA/AA
Page 11 - ../A/../AA/AA
Page 12 - AA/AA/AA/AA/AA
Cave of Trial II - AA
Cave of Trial III - B
Leafre Stampede - AA
Terrapin Trouble - AA
Terrapin Trouble II - AA
712 GP
For Page 14, you can just AA rank the missions in subsequent order, since you obtained all that GP before.
This page is where the game gets somewhat grindy again, but it won’t be as bad as Wolf Territory to R.C.M.P.
Path of Ascendance 2
Page 1 - A/A/AA/AA/AA
Page 2 - AA/AA/AA/AA/AA
Page 3 - AA/AA/AA/AA/AA
Page 4 - AA/AA/AA/AA/AA
Page 5 - AA/AA/AA/AA/AA
Page 6 - AA/AA/AA/AA/AA
Page 7 - AA/AA/B/AA/B
Page 8 - AA/A/A/A/AA
Page 9 - AA/A/AA/AA/..
Page 10 - AA/../AA/AA/AA
Page 11 - ../A/../AA/AA
Page 12 - AA/AA/AA/AA/AA
Page 13 - AA/AA/AA/AA/AA
Dangerous Sea Gorge - AA
Leafre Safari - AA
Forbidden Time - AA
Jaws - AA
760 GP
There are a lot of incomplete missions (mostly bosses) on Pages 9 to 11, so that can be some easy GP:
- AA rank Wiseman’s Fountain on Page 9
- AA rank Wolf Territory II on Page 10
- AA rank Cursed Sanctuary and A rank Running With The Devil on Page 11.
… which will give you 46 GP.
Now, you can get an extra 36 GP from Cornian Battle Troupe, Cornian Elite Squad, and Warped Passage.
This is where I will stop going in depth for what to do. From here, you will have to start AAA or S ranking missions to get any farther.
The first step to S rank a mission is to never miss, and to always keep the monsters behind the blue triangle. This can give you an easy x10 multiplier on your mission score.
If the first step does not work (as with most missions before Page 7), then there is a specific way to fire which will spike your score. At each mission, move your mouse cursor around the second “0” of the “Power: 100%” text on the left of the Battle Screen, and fire from there. It will take some time to get used to, but it will help greatly.
For your convenience: to get Balrog Family Reunion on Page 16, you will need 900 total GP, and even more for HermitStory (925) and Athena Pierce (950).
Here is a list of relatively easy missions to start AAA or S ranking.
Page 1: N/A (this is possibly the hardest page to fully S rank in the game)
Page 2: Logger’s Nightmare, Double Bubble Trouble
Page 3: Land of Wild Boar, Land of Wild Boar II, Land of Wild Boar III
Page 4: Lorang Lorang, Chronos Platoon, Pixies Part II
Page 5: Chronos Brigade, Cybernetic Defense Squad
Page 6: Everything
Page 7: Forest of Dead Trees, Forest of Dead You, Dangerous Valley II
Page 8: Drake’s Meal Table, Fire & Ice
Page 9: Everything
Page 10: Everything
Page 11: Cursed Sanctuary, R.C.M.P., Warped Path of Time
Page 12: Everything
Page 13: Everything
Page 14: Everything
Page 15: Everything
Page 16: Balrog Family Reunion, The Call of Zakum
Right now, your main goal is to get 100,000,000 mesos as fast as you can, and then achieving Level 160. Then you can ascend, which I will tell you more about after this section.
Once you hit 6th job, pour all your SP points into that. Maxing out “Go Outside” on 6th job is essential for ascending.
For goals to do while getting Level 160, I’d try and unlock Page 17 and Page 18, which are secret pages unlocked at 1,000 GP+. They are great for quickly getting mesos and EXP later on into the game, but for now, get the materials required to ascend.
Path of Ascendance 3
Level 160
100,000,000 mesos
6th job skill “Go Outside” - Level 10
Ascending
Good job! You’ve grinded 100,000,000 mesos and worked your way up to at least Level 160 (although going past is much more likely). Now you have the chance to ascend.Ascending in Hunterstory will bring you back to Level 1 (with all your GP, don’t worry), but with a few perks which makes it easier to ascend again. The perks you get accumulate with each ascent you go through, so the more ascents you have, the faster you can ascend.
First, look again at the skill Go Outside on the 6th job window. You’ll notice it now has a max skill level of 11. Max it out.
If you’ve gone into the shop on the main screen, you’ll notice this button on the bottom-right corner, the Curiosity Shop. Before Level 160, it didn’t have much: you can have some fortunes, skill resets, and show your stats. Now if you check it, a new choice will appear: “Ascendance Test”, costing 99,999,999 mesos. Buy it to start the test. (Don’t worry about failing and losing the money — you need 100 million mesos to buy it, but it will only actually cost 1 meso.)
You’ll be facing a boss named “The Ascendant” with 42,424,242 HP. It doesn’t move, so don’t worry about the boss too much. Instead, worry about the enemies inside.
The first enemy is an Ascendance Alishar, which has around 1,200,000 HP, but it moves slowly.
The second enemy is an Ascendance Red Snail, which has around 450,000 HP, but it moves very fast.
The Red Snails are the worst, because they go right below The Ascendant, so you have to adjust your mouse position to shoot them down.
After you have slain The Ascendant, you will be congratulated with an ascendance screen. There are 5 perks that you can receive:
Bonus EXP (raises your EXP multiplier, so a Red Snail(8 EXP) with 150% Bonus EXP will give you 12 EXP instead.)
Bonus Mesos (raises your Meso multiplier)
Bonus Starting SP (gives you more starting SP once you ascend)
Bonus Max Skill Level (gives certain skills a higher max level)
Bonus DEX (adds starting DEX, your damage stat)
Each ascent, you automatically get one point in each spot, but you get 5 Bonus Points (BP) for your first ascent, which you can spend on whatever perks you choose.
Usually, I would go for Bonus Mesos for the first ten ascents to get bows faster, then I would go straight into Bonus EXP. This eradicates the grinding section of the game, so Hunterstory becomes more fun instead of tedious.
Now, click the blue button. Congratulations on your first ascent!
The time it takes to ascend again will be shorter now, although not by much. Also, the next time you ascend, you will get one more BP to spend, up to a maximum of 20.
To give you something to look forward to: my current savefile is at 77 ascents, and I can ascend in around 2 minutes, ignoring the SP addition.
That is the end of the Hunterstory guide! I hope you found it at least somewhat informative.
Recommended Training Spots
Red Snerg RushDouble Bubble Trouble
Leporidae Marching Band
Chronos Platoon
Cybernetic Defense Squad
Defeat Kittens
Forest of Dead You
Fire & Ice
Excavation Site
Wolf Territory I
R.C.M.P.
Unbalanced Time
Terrapin Trouble/Terrapin Trouble II
Leafre Safari/Jaws
Cornian Battle Troupe/Cornian Elite Squad
HermitStory
Mutant Faeries
Uranium Valley
Dead Trees and Fallout
Nuclear Kargo
Permanent Silly Level
The Return of Zakum
Secrets
There are secrets to the game, and I will list them here.
Page 17 & 18
They are unlocked with enough GP to unlock it, so keep getting that GP!
Secret Badges
Badges that are, well, secret.
The Call of Zakum
The last mission of Page 16.
Eat Fortune Cookies, and when you get “You will have a VERY bad day”, you will fight Zakum.
Doesn’t matter if you fail, you unlock it anyways.