Scoring
tl;drThere are two stages to scoring: a mission score (shown on the side in the mission UI), and the total score, which is the mission score with the accuracy and the repel rate factored in. The factors affecting the score and their multipliers are listed below:
- damage factor: 10 * total damage, capped by mob HP
- arrow factor: 1.417x to 4.205x
- distance multiplier: 1.417x (at the red arrow) to 3.083x (the edge of the screen) to 3.22x (where they actually spawn)
- hang time multiplier: 1x to 1.364x (capped at 80 frames = 2.666 seconds)
- acc/repel rate: 0x to 10x (percents multiplied together then divided by 1000)
Bonus EXP after a mission is only earned for a C grade or higher; mesos are earned for an F or higher.
Some ways you can affect the scoring:
- Before killing the 25th mob, you can deal extra damage to other mobs to get more points. (This also applies to boss missions, since the mission won’t end until the boss is dead.)
- Mobs spawn beyond the edge of the screen. If you’re running Hunterstory standalone, you can resize the game window to see this, which gives you an extra +10% multiplier of reaction time.
The score calculations are done in two stages, first tallied up within the mission as your mission score (shown on the side in the mission UI), then, after the mission ends, some post-mission stats (accuracy and repel rate) are factored in to get your total score, which is used for total points/GP.
Scoring
For every arrow hit, mission score is incremented by these formulas:
multipoint = ((x + 300) / (300 - revisehang))
missionscore = missionscore + Math.round(((10 * multipoint) * pain) / hpx)
where
xis the x-coordinate of the mobrevisehangis the hang time of the arrow in frames (capped to 80)painis the damage dealt to the mob (capped to its current HP)hpxis the mob’s HP multiplier (see [Monsters])
We can split these factors into two groups: one involving damage (10*pain/hpx) and the other based on the arrow (multipoint).
Generally, the damage factor is a constant, 10 times the mob’s HP. Since pain is always capped to the mob’s current HP, over all the hits the mob receives, the total pain a mob receives can’t exceed its total HP. This means we can’t overkill a mob or manipulate it in some way to get more points out of it — although we can still affect the damage inflicted over all the mobs in the mission (there’s a couple of ideas how below). The division by hpx normalizes the point gain of the mob, so randomly buffed mobs will still give as many points as normal mobs (see [Monsters] for more details).
The arrow factor is the one the player has control over. I’ll describe it in two parts, as a distance multiplier (x+300)/300, and a hang time multiplier 300/(300-revisehang). In game, mobs can only be from x = 125 to 666 (125 being the red death arrow, 666 where they spawn, and 625 the edge of the screen), which means the distance multiplier can vary from 1.417x to 3.22x (3.083x). The hang time is capped to 80, so its multiplier ranges from 1x to 1.364x. Putting these together, the total range of the arrow factor is 1.417x to 4.205x. Realistically though, the distance range would be smaller because the arrow needs some time to move from you to the monster, and you probably won’t hit a mob right when it spawns.
After the mission ends, total score is then calculated with the following formula:
totalscore = Math.round(((missionscore * accuracy) * repel) * 0.001)where accuracy and repel are the percentages as shown on the results screen (numbers from 0 to 100, rounded to one decimal point). With both accuracy and repel at 100, the effect they can have is 10x, a pretty big multiplier compared to the arrow factor. It’s possible to S with a non-perfect acc/repel rate, but because the S rank requirement is so high, there’s not much room for the arrow factor to make up the difference.
In summary, here’s a list of each score multiplier and their ranges:
- HP factor: 10 * the mob’s HP
- distance multiplier: 1.417x to 3.22x (3.083x at x=625)
- hang time multiplier: 1x to 1.364x
- acc/repel rate: 0x to 10x
- overall arrow factor: 1.417x to 4.205x
Bonus EXP/Meso Gain
if (repel < 50) {
    repel = 50;
}
if ([F grade achieved]) {
    repel = 30;
}
earnedmeso = Math.round((((Math.pow(missionscore, 0.72) * repel) * accuracy) * mesomulti) * 6E-5)
if ((grade <= 6) && (grade != 0)) {
    bonusexp = Math.round((totalscore * (10 - grade)) / (20000 * Math.sqrt(level)));
}
where
mesomultiis the bonus meso multiplier from ascensionlevelis your current level,gradeis based on your mission grade (0 is F, 1 to 7 are S to D in order),- and the remaining variables (
missionscore,totalscore,repel, andaccuracy) are stated as above
EXP is only awarded for a C grade or higher, and mesos are awarded for any grade (even if you fail). The repel used in the meso gain calculations is capped under at 50 if you pass the mission, and at 30 if you fail, so you’ll always have some mesos awarded if you hit any mobs. The meso gain formula itself is like a down scaled version of the total score calculation with a smaller scaling constant. The bonus EXP is based linearly on your grade and inversely with the square root of your level. In normal gameplay the effect of the level reduction is too small to notice: it’d take 4x the level to half the EXP, and by that time you’d be doing harder missions anyways (and it’s not like bonus mission EXP matters much anyways).
Analysis/Conclusions
Although the mob’s individual HP factor is capped, the total HP factor for the mission score is the sum of the 25 mobs you kill to end the mission, plus whatever extra damage you deal without killing. This means dealing extra damage to mobs that happen to be around your 25th will give a few extra points, and for a multi-stage mission, if more mobs with higher HP happen to spawn that’ll increase the factor too. If you’re playing with a raw .swf file, you can stretch the window the game is in horizontally to see beyond the boundaries of the screen, and to where the mobs are spawning, giving you a little extra distance (41 pixels, or +0.13x multiplier).
Calculating S-Rank Difficulty
Since the HP factor is (mostly) constant and perfect acc/repel rate is easy enough to grind out if you’re strong enough to care about S-ranks, the arrow factor is the only real difficulty. If we divide these two factors out of the S-rank requirement, we can get an expression for the minimum average arrow factor needed for an S:
(arrow factor) >= (points to S)/((damage dealt during mission)*10 * (acc, repel rate))and, assuming perfect accuracy and repel rate, and that only 25 mobs are hurt and killed we can reduce this to:
(arrow factor) >= (points to S)/((expected HP of mob)*25*10 * 10)To get an idea of what exactly we’d need to do for this arrow factor, we can put in the formula for the arrow factor and rearrange to get a region of hang time vs. distance:
(x+300)/(300-(hang time)) >= (arrow factor)
   (x+300)/(arrow factor) >= 300-(hang time)
              (hang time) >= 300-(x+300)/(arrow factor)
Note that 0 <= hang time <= 80 since hang time is capped at 80 frames.
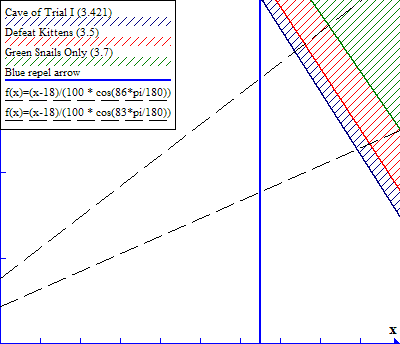
Here’s a shoddy plot of hang time vs. distance, from 125 <= x <= 625 and 0 <= hang time <= 80. Displayed are the regions for three single-monster missions, with the minimum arrow factor needed to S-rank them (as calculated with the formula above), plus the hangtime/distance trajectories of two arrows shot at 83 and 86 degrees.